Monday, August 24, 2009

carrot zucchini bread

Ingredients

1 1/2 cups whole wheat flour
2 tablespoons ground flax seed (flax meal)
1 1/2 teaspoons cinnamon
1/2 teaspoon nutmeg
1 teaspoon baking soda
1/2 teaspoon salt
1/8 teaspoon baking powder
1 egg
1 cup sugar
1/4 cup brown sugar
1/2 cup oil
1 teaspoons vanilla
1 1/2 cup grated zucchini
1/2 cup grated carrots

Directions

  1. Mix dry ingredients in a bowl and set aside.
  2. In a separate bowl, beat egg and add sugars. Then add oil and vanilla and mix until smooth.
  3. Stir in vegetables.
  4. Add dry ingredients.
  5. Pour into greased bread pan. Bake 45-55 minutes at 350 degrees until an inserted toothpick comes out clean.

from fitSugar

Thursday, August 20, 2009

andes mint cookies


I guess I'm being a bit facetious in saying that cookies are in season here in Utah, or that they even have one. But honestly, cookies do have a certain window of time when they are found in abundance. The holidays are that time. I want to share with you one of my favorites.


andes mint cookies

¾ c. butter (1½ stick)
1½ cup brown sugar
2 Tablespoons water
12 oz. (2 cups) chocolate chips (I do 1 cup bittersweet, 1 cup semi)
2 eggs
2 ½ cups flour
1 ½ teaspoon baking soda
½ teaspoon salt

In a large bowl melt together the butter, brown sugar, water and chocolate chips. *I microwave it for a minute at a time stirring after each until melted.

Beat in eggs, add in sifted remaining dry ingredients until blended. Chill 1 hour or overnight. Shape into 1 inch balls and place on greased cookie sheet. Bake @ 325°F for 8-10 minutes. Place mint on top, you may want to place back in the oven for a second or two. Spread when melted. Let cool completely; or not.

from here

Wednesday, August 19, 2009

Banana Oatmeal Cookies


Banana Oatmeal Cookies
Inspired by Cooking Light

Ingredients

2 ripe bananas
1/2 cup butter softened
1/2 cup dark brown sugar
1/4 cup white sugar
1 1/2 teaspoons vanilla
2 large eggs
1 cup whole wheat flour
1/2 cup flax meal
1 teaspoon baking soda
1/2 teaspoon salt
1 teaspoon cinnamon
3 cups old fashioned oats
1 cup peanuts
1 cup chocolate chips

Directions


* Pre-heat oven to 325 degrees. Spray cookie sheets with cooking spray.
* Cream together bananas, butter, and sugars with a mixer. Add vanilla and eggs, stir until well combined.
* In a separate bowl whisk together flour, flax meal, baking soda, salt, and cinnamon.
* Add dry ingredients to banana mixture and mix well. Stir in oats, peanuts, and chocolate chips.
* Drop tablespoon-size balls of dough onto greased cookie sheets. Bake for 12 to 15 minutes, or until browned. Cool on sheet for two minutes before moving to a cooling rack.

Makes 48 cookies.

Friday, August 14, 2009

multi-grain almond cookies

From my co-worker, Scott Davis

Here is the recipe for those cookies. I think I'm going to make them again soon, so I'll let you know if I improve it any. I used a grain mill to grind the almonds and barley, but you might be able to use a food processor or pulse it in a blender. I think the almonds might be what made them so good, but you could also omit just about any of the grains and it would probably be fine.

Multi-Grain Almond Cookies

2 c butter
1/2 c peanut butter
3 c brown sugar
1 c white sugar
1/4 c honey
4 eggs
2 t. vanilla

mix butter and sugars and eggs. (you could replace some of the butter with applesauce and even reduce the sugar a little if you want a little healthier cookie. applesauce might soften it up a little.)

then mix together the following and add.

4 c toasted rolled oats (bake 325 for 15 min on a cookie sheet)
1.5 c coarsely ground almonds
1.5 c coarsely ground pearl barley
2 T flaxseed
1 c shredded coconut
4 c whole wheat flour
1.5 t baking soda
1.5 t baking powder
1 t salt
1 t cinnamon
1/2 t ginger

the dough should be pretty stiff by now, add the raisins and chocolate chips.

1/5 c raisins
1 bag chocolate chips

Flatten the cookies on a baking sheet (they don't spread much) and bake for 10 min at 350 degrees. It's best if they don't look quite done, they will harden as they cool. If they start to brown very much they will be very crunchy.

Tuesday, August 4, 2009

steve pavlina's rawesome guacamole

Ingredients

* 2 large avocados (or 3 small ones)
* juice of 2 limes (about 1/4 cup)
* 1 medium tomato (or 2 roma tomatoes), chopped
* 3/4 cup chopped fresh cilantro
* 1/3 cup chopped green onion
* 1 teaspoon minced jalapeño pepper (red or green)
* 1 teaspoon sea salt

Directions

1. Put the avocado flesh into a bowl. Add the lime juice. Mash the avocado and lime juice together with a fork until creamy.
2. Fold in tomato, cilantro, green onion, jalapeño pepper, and sea salt.
3. Enjoy!

Notes / Suggestions

1. This guacamole works especially well as a dip for organic carrot and celery sticks. It also goes well with flax crackers. If you aren’t a raw foodist, it goes well with tortilla chips too of course.
2. Feel free to adjust the ingredient ratios to suit your tastes (i.e. more green onion, more jalapeño, more or less salt, etc).
3. If you like spicy guacamole, feel free to double or triple the jalapeño (or more). The version above is pretty mild.

whole wheat raspberry almond thumbprint cookies

Ingredients
1/2 C. butter
1/3 C. lightly packed brown sugar
1/2 t. almond extract
1 C. whole wheat flour
1/2 C. toasted almond meal or flour (toasted ground almonds)

1. Preheat oven to 350 degrees
2. Using a mixer, cream together butter and sugar until light and fluffy.
3. Whisk together flour and almond meal then add to butter mixture and blend well.
4. Put cookie dough in refrigerator for 30 minutes.
5. Line two baking sheets with parchment paper; roll teaspoonfuls of dough into balls and place on baking sheet; make an indentation with your fingertip in the center of each ball.
6. Bake for 15 minutes or until the edges are just slightly brown. Let cool on wire rack.
7. Fill cookies with raspberry jam.

Yield: approximately 2 dozen cookies

From Pinch My Salt by Nicole
This recipe is based on the Thumbprint Cookies found at Cafe Fernando

cheesy chicken burrito with chips and salsa

yield: Makes 4 servings

Ingredients

* 1 cup precooked chicken slices
* 1 cup canned black beans, rinsed
* 1 cup cooked brown rice
* 1 cup cooked broccoli
* 1 cup shredded reduced-fat cheddar
* 4 whole-wheat tortillas (8 inches each)
* 1 cup prepared salsa
* 2 servings chips and salsa

Preparation

Pile chicken, beans, rice and broccoli in a bowl; top with cheddar. Microwave about 3 minutes, stirring once. Divide mixture on tortillas and wrap. Top each with 1/4 cup salsa. Serve with chips and salsa.

Nutritional Information

Calories 343; Total Fat 7g; Carbohydrates 46g

Amounts per serving plus the % Daily Value (DV) based on a 2,000 calorie diet:

* 343 Calories (17%)
* 7g Total fat (10%)
* 2g Saturated Fat (10%)
* 37mg Cholesterol (12%)
* 745mg Sodium (31%)
* 46g Carbohydrate (15%)
* 7g Fiber (27%)
* 25g Protein (50%)

homemade girl scout cookies - samoa bars


This is basically a shortcut recipe that still delivers all the great samoas flavor without some of the more tedious parts of cooking making. These bars have a buttery shortbread base that is topped with the caramel-coconut samoas topping and chocolate. It is made in three stages. First, the shortbread is baked and cooled. Then, the coconut topping is applied. Put the coconut on while it is hot, so it will be fairly easy to push it around. It’s a thick mixture, but a spatula is all you need to press it into an even layer. The bars should be cut after the topping has been applied, and even though the shortbread has a melt-in-your mouth quality to it, the topping holds the bars together well. I recommend using a large knife or a pizza cutter to slice up the bars easily and neatly; small knives don’t work quite as well.

The final step is to dip these in chocolate once the topping has set. Since samoas have chocolate on the bottom and a chocolate drizzle on top, I kept that same look for my bar cookies. If you want something a bit simpler, just dip half that bars in chocolate - or skip the dipping in favor of a drizzle. The important thing is that all the flavors get into the batch. And that you have some friends to share these with, because they can be quite addictive.

Cookie Base:
1/2 cup sugar
3/4 cup butter, softened
1 large egg
1/2 tsp vanilla extract
2 cups all purpose flour
1/4 tsp salt

First, make the crust.
Preheat oven to 350F. Lightly grease a 9×13-inch baking pan, or line with parchment paper.
In a large bowl, cream together sugar and butter, until fluffy. Beat in egg and vanilla extract. Working at a low speed, gradually beat in flour and salt until mixture is crumbly, like wet sand. The dough does not need to come together. Pour crumbly dough into prepapred pan and press into an even layer.

Bake for 20-25 minutes, until base is set and edges are lightly browned. Cool completely on a wire rack before topping.

Topping
3 cups shredded coconut (sweetened or unsweetened)
12-oz good-quality chewy caramels
1/4 tsp salt
3 tbsp milk
10 oz. dark or semisweet chocolate (chocolate chips are ok)

Preheat oven to 300. Spread coconut evenly on a parchment-lined baking sheet (preferably one with sides) and toast 20 minutes, stirring every 5 minutes, until coconut is golden. Cool on baking sheet, stirring occasionally. Set aside.

Unwrap the caramels and place in a large microwave-safe bowl with milk and salt. Cook on high for 3-4 minutes, stopping to stir a few times to help the caramel melt. When smooth, fold in toasted coconut with a spatula.

Put dollops of the topping all over the shortbread base. Using the spatula, spread topping into an even layer. Let topping set until cooled.

When cooled, cut into 30 bars with a large knife or a pizza cutter (it’s easy to get it through the topping).

Once bars are cut, melt chocolate in a small bowl. Heat on high in the microwave in 45 second intervals, stirring thoroughly to prevent scorching. Dip the base of each bar into the chocolate and place on a clean piece of parchment or wax paper. Transfer all remaining chocolate (or melt a bit of additional chocolate, if necessary) into a piping bag or a ziploc bag with the corner snipped off and drizzle bars with chocolate to finish.

Let chocolate set completely before storing in an airtight container.

Makes 30 bar cookies.

Note: You can simply drizzle chocolate on top of the bars before slicing them up if you’re looking for yet an easier way to finish these off. You won’t need quite as much chocolate as noted above, and you won’t quite get the Samoas look, but the results will still be tasty.

spicy chicken and rice

yield: Makes 4 servings

Ingredients

* 2 tablespoons extra-virgin olive oil
* 4 large chicken thighs with skin and bones (about 2 pounds)
* Ground cloves

* 1 1/2 cups diced seeded red bell peppers
* 1 cup chopped onion
* 1/3 cup golden raisins
* 1/3 cup coarsely chopped pitted imported green olives
* 4 small bay leaves
* 2 garlic cloves, peeled
* 1 teaspoon hot chili paste (such as sambal oelek) or 1 small serrano chile, chopped
* 1 1/2 cups jasmine rice or long-grain white rice (9 to 10 ounces), rinsed, drained
* 2 to 2 1/2 cups low-salt chicken broth

Preparation

Heat oil in large skillet over medium-high heat. Sprinkle chicken generously with salt and pepper, then lightly with ground cloves. Add chicken to skillet and sauté until brown, about 5 minutes per side. Transfer chicken to plate.

Pour off all but 4 tablespoons fat from skillet. Add bell peppers, onion, raisins, olives, bay leaves, garlic, and chili paste to skillet. Sauté until vegetables begin to soften, about 2 minutes. Add rice; stir 1 minute. Press chicken into rice. Add 2 cups broth; bring to boil. Cover, reduce heat to medium-low, and simmer until chicken is cooked through and rice is tender, adding more broth if dry, about 20 minutes.

Nutritional Information

Calories 579; Total Fat 20g; Carbohydrates 75g

Amounts per serving plus the % Daily Value (DV) based on a 2,000 calorie diet:

* 579 Calories (29%)
* 20g Total fat (30%)
* 4g Saturated Fat (21%)
* 57mg Cholesterol (19%)
* 622mg Sodium (26%)
* 75g Carbohydrate (25%)
* 4g Fiber (16%)
* 25g Protein (50%)

red velvet valentine sandwich cookies

Ingredients

1 Box red velvet cake mix*
1/2 Cup butter, softened to room temperature
2 Eggs

* Preheat oven to 350 degrees.
* Mix ingredients until combined.
* Drop spoonfuls of cookie batter onto baking sheet about two inches apart.
* Bake for 10-12 minutes.
* Cool.

Cream Cheese Filling
1/2 Cup butter, softened to room temperature
1 8 oz. Package cream cheese, softened to room temperature
1 1lb. Box of confectioner's sugar
1 tsp Vanilla

* In a mixer, cream butter, cream cheese and vanilla.
* Gradually add sugar and mix until smooth.

Makes about 24 cookies or 12 cookie sandwiches

* Any cake mix should work.

Recipe amended slightly from this one at allhomemadecookies.com

To assemble, spoon a small amount of frosting on the flat side of one cookie. Take another cookie and press together until frosting is flush with the edge.

Tip: For consistent size cookies, use a 1.5 inch small ice cream scooper when placing batter on the baking sheet.

The finished cookie size will be about 3 inches wide.

granola bars

Ingredients

1/4 cup almonds, toasted and chopped
1 cup rolled oats
1/3 cup whole wheat pastry flour
1/4 cup unsalted sunflower seeds
1/4 cup dried currants (I usually use golden raisins)
1/2 tsp ground cinnamon
2 tbsp granulated cane sugar or maple sugar
1/4 tsp salt
1/4 cup almond butter (peanut butter works well too)
1/2 cup maple syrup (I usually use part honey)
1 tsp vanilla
1/4 cup apple juice (or any juice on hand)

Directions

- Preheat oven to 350 F. Oil an 8 x 8- inch baking pan
- Place almonds, oats, flour, sunflower seeds, currants, cinnamon, sugar and
salt in a medium bowl and stir to combine.
- Whisk the almond butter, maple syrup, vanilla and juice together in
another bowl.
- Pour the wet ingredients into the dry, stirring until the dry ingredients
are thoroughly moistened.
- Press the mixture evenly into the prepared pan and bake for 25 minutes.
- Remove pan from oven and cut into 8 (or 16) bars.
- Return pan to the oven and bake until golden brown, about 10-15 minutes.
- Cool in pan for about 10 minutes. Then remove bars with a spatula and
cool on a rack for at least 30 minutes.

From “The Healthy Headonist” by Maya Kornfeld

pita bread

pita bread

Oh, am I so happy to finally have a great pita recipe. You see, pitas themselves aren’t hard to make. Most recipes very closely, or even exactly, resemble a standard pizza dough and they’re not much more difficult to assemble. No, the trouble comes when you pop them in the oven and pray for the kind of puffiness you can pop some falafel into and end up with flatbread. Delicious, warm, toasty flatbread, but definitely not a pita.

pitas, risingpita breadsrolling the pitaspita, baked and puffed

But this works! These babies puffed up like a mouth-watering poori bread in the oven, coming out closer to balloons than pizzas — at last. The technique, which should be 100 percent attributed to Rose Levy Beranbaum’s brilliance, and not my own, puts indiviuals pitas on a searing hot baking stone (or if you’re me, and have busted another one I don’t want to talk about it a cast iron skillet) and bakes them for just three minutes. I found that spritzing the tops with water guaranteed a perfect puff, but really, that’s all there is. It’s that easy.

cooling on a towel

This may also be the perfect starter bread, for those of you intimidating by the bread-making process. A long rise in the fridge lends itself to a developed flavor we associate with high-end artisanal breads; it also does the hardest work for you. The ingredients are as simple as any bread can be and with a baking time of three minutes per pita, it’s hard to argue that it will keep you tied to the kitchen for long. Best part — even if yours don’t puff, you’ll still have a most delicious flatbread, and with a little extra effort,the most delicious hummus to dip it into.

perfect pockets

One year ago: Almond Biscotti

Deb went on vacation and all I got were these lousy pita breads! Wondering why your comments aren’t being responded to at the speed that you’ve come to expect? It’s true, we’ve flown the coop and we’ll be back at the end of the week. But come on, we left you homemade pita bread — you shouldn’t have to miss us at all.

Pita Bread
Adapted from The Bread Bible

3 cups plus a scant 1/4 cup unbleached all-purpose flour (16 oz./454 grams)
2 teaspoons salt (1/2 oz./13.2 grams)
2 teaspoons instant yeast (6.4 grams)
2 tablespoons olive oil (1 oz./27 grams)
1 1/4 cups water, at room temperature (10.4 oz./295 grams)

1. About 1 1/2 hours before shaping, or for best flavor development, 8 hours to 3 days ahead, mix the dough.

Mixer method: In the bowl of a stand mixer, combine all the ingredients. With the paddle attachment, mix on low speed (#2 if using a KitchenAid) just until all the flour is moistened, about 20 seconds. Change to the dough hook, raise the speed to medium (#4 KitchenAid), and knead for 10 minutes. The dough should clean the bowl and be very soft and smooth and just a little sticky to the touch. Add a little flour or water if necessary. (the dough will weigh about 27.75 oz./793 grams.)

Hand method: In a large bowl, combine all the ingredients except for a scant 1/4 cup of the flour. With a wooden spoon or your hand, mix until all the flour is moistened. Knead the dough in the bowl until it comes together.

Sprinkle a little of the reserved flour onto the counter and scrape the dough onto it. Knead the dough for 5 minutes, adding as little of the reserved flour as possible. Use a bench scraper to scrape the dough and gather it together as you knead it. At this point it will be very sticky. Cover it with the inverted bowl and allow it to rest for 5 to 20 minutes. (This rest will make the dough less sticky and easier to work with.)

Knead the dough for another 5 to 10 minutes or until it is soft and smooth and just a little sticky to the touch. Add a little flour or water if necessary. (The dough will weigh about 27.75 oz./793 grams.)

2. Let the dough rise: Using an oiled spatula or dough scraper, scrape the dough into a 2-quart or larger dough-rising container or bowl, lightly greased with cooking spray or oil. Press the dough down and lightly spray or oil the top of it. Cover the container with a lid or plastic wrap. With a piece of tape, mark the side of the container at approximately where double the height of the dough would be. Refrigerate the dough overnight (or up to 3 days), checking every hour for the first 4 hours and pressing it down if it starts to rise.

3. Preheat the oven: Preheat the oven to 475°F one hour before baking. Have an oven shelf at the lowest level and place a baking stone, cast-iron skillet, or baking sheet on it before preheating.

4. Shape the dough: Cut the dough into 8 or 12 pieces. Work with one piece at a time, keeping the rest covered with a damp cloth. On a lightly floured counter, with lightly floured hands, shape each piece into a ball and then flatten it into a disk. Cover the dough with oiled plastic and allow it to rest for 20 minutes at room temperature.

Roll each disk into a circle a little under 1/4 inch thick. Allow them to rest, uncovered, for 10 minutes before baking.

5. Bake the pita: Quickly place 1 piece of dough directly on the stone or in the skillet or on the baking sheet, and bake for 3 minutes. The pita should be completely puffed but not beginning to brown. The dough will not puff well if it is not moist enough. See how the pita puffs, then, if necessary, spray and knead each remaining piece with water until the dough is soft and moist; allow to rest again and reroll as before.* (However, those that do not puff well are still delicious to eat.)

* After my first pita didn’t puff well, and I realized I was too lazy to spritz and reroll and rise each remaining pita, I instead spritzed each rolled-out pita with water two or three minutes before baking it. It worked magically — all of the remaining pitas puffed perfectly. Try this method first if yours don’t puff, if it doesn’t work to you, revert to Beranbaum’s suggestion of kneading the extra moisture in.

Proceed with the remaining dough, baking 3 or 4 pieces at a time if using a stone or baking sheet. using a pancake turner, transfer the pita breads to a clean towel, to stay soft and warm. Allow the oven to reheat for 5 minutes between batches. The pitas can be reheated for about 30 seconds in a hot oven before serving.

To cook the pitas on the stove top: Preheat a griddle or cast-iron skillet over medium-high heat. Lightly grease the surface and cook the pitas one at a time. Cook for about 20 seconds, then turn the dough and continue cooking for 1 minute or until big bubbles appear. Turn the dough again and cook until the dough balloons. If the dough begins to brown, lower the heat. The entire cooking process for each pita should be about 3 minutes.

Whole wheat variation: For a whole wheat version, use half whole wheat and half white flour. If using regular whole wheat flour, for best results, grind it very fine or process it in a food processor for 5 minutes to break the bran into smaller particles. Finely ground 100% whole wheat flour (atta), available in Middle Eastern food markets, is the finest grind available. Or, for a milder but wheatier flavor and golden color, try 100% white whole wheat flour. You will need to add 1/4 cup more water, for a total of 1 1/2 cups (12.4 oz./354 grams).

blueberry lemon muffins

Ingredients:

2 cups flour
1 T. baking powder
1/2 t. salt
1 egg
1 cup sugar
4 T. melter butter
2-3 t. lemon extract
1/2 cup buttermilk
1 1/2 cup frozen or fresh blueberries (Costco has super on-point blueberries, frozen or fresh)
brown sugar for topping

Preparation:

Preheat oven to 350 degrees. Whisk flour, baking powder and salt in a medium bowl until combined. Whisk the egg in a second medium bowl until well-combined and light-colored, about 20 seconds. Add the sugar and whisk vigorously until thick and homogeneous, about 30 seconds; add the melted butter in two or three additions, whisking to combine after each addition. Then gradually add lemon extract, followed by buttermilk. Whisk just to combine.

Add berries to the dry ingredients and gently toss, just to combine. Add buttermilk mixture and fold with a rubber spatula until the batter comes together and the berries are evenly distributed, 25 to 30 seconds. (Small spots of flour may remain and the batter will be thick. Do not overmix.)

Use a greased cookie scoop or spoon to scoop the batter into muffin tins. To top muffins with brown sugar, use about 1/2 of a small spoonful per muffin and spread sugar over the top of each one. Bake about 25 minutes until lightly golden. Makes about 12.

italian tortellini soup

Ingredients

1 lb. Italian sausage
1/2 c. sliced onion
2 cloves minced garlic
1 1/2 c. chopped fresh zucchini
3 cans chicken broth
2 (14 3/4 oz.) cans stewed tomatoes
1/2 tsp. salt
1/4 tsp. pepper
8 oz. cheese tortellini
Parmesan/Romano cheese for topping

Directions

-Brown sausage and drain fat.
-In a large pan add garlic, onion, and zucchini. Stir fry for 5 minutes.
-Add chicken broth, stewed tomatoes, salt, and pepper. Cover and cook for 15 minutes.
-Add cheese tortellini and simmer for 20 minutes or until tortellini is tender.
-Sprinkle with Parmesan/Romano cheese.

You can improvise a little bit and add extra zucchini, extra onion, extra garlic, and a dash of basil. If you want vegetarian, replace chicken broth with vegetable broth and then cut out the sausage.

baked chimichangas

baked_chim_med

This is a favorite for those of us who like Mexican food.

4 (8-inch) or 8 (6-inch) whole-wheat tortillas.

Filling:
1 1/2 cups cooked and cubed chicken
3/4 cup salsa, thick and chunky
1/2 cup (2 ounces) grated, reduced-fat cheddar or Mexican blend cheese
Optional:
extra salsa
Spanish Yogurt Sauce
Preheat oven to 400 degrees. Mix filling ingredients in a medium bowl.
Warm tortillas until pliable (about 5 seconds each in microwave or in a nonstick skillet). Wet one side of tortilla and place wet side down. Spoon on filling ingredients. Fold to hold in filling.
Spray baking dish with nonstick cooking spray. Lay chimichangas, seam side down, on baking dish. Bake for 15 minutes.

VARIATIONS: Beef, Pork, or Turkey Chimichangas—Substitute ground or diced beef, pork, or turkey for chicken.
Makes –4 servings

Each Serving
Carb Servings
2 Exchanges
1 1/2 starch
1 vegetable
3 lean meat
Nutrient Analysis
calories 260
total fat 5g
saturated fat 2g
cholesterol 50mg
sodium 544mg
total carbohydrate 27g
dietary fiber 2g
sugars 5g
protein 24g

pasta with roasted pepper sauce

REE_1669

Printable Recipe - PW’s Pasta with Roasted Red Pepper Sauce

I love pasta. Always have. Always will. And I prefer pasta sauce without meat—a throwback to my vegetarian days in sunny Los Angeles. The way I see it, there are just too many delicious non-meat ingredients that accompany pasta so well, and there’s no need to mess it all up with sausage or ground beef or chicken.

Today’s dish is the perfect example.

I used to eat a dish just like this at a restaurant in Los Angeles, and when I moved away I was forced to replicate it in my kitchen lest I begin to confuse nostalgia for this pasta with nostalgia for James and run back to southern California. And it’s a good thing I DID figure it out, or I might be living in a house in Newport Beach with 1.7 children and a dog named Britney.

Not that everyone in Newport Beach has 1.7 children and dogs named Britney. But I would have.


REE_1572To begin, fire up the grill (the range in the Lodge has this built in grill), the broiler, or the open flame on your cooktop. All are equally effective.


REE_1579What we need to do is char the heck out of the red peppers.


REE_1580


REE_1582Whether it’s under the broiler or on the grill, I usually blacken them for about ten minutes, then remove them and set them on a plate for a few minutes.


REE_1596After a few minutes, throw the peppers into a large Ziploc bag.


REE_1597Seal the bags. We need to let them sweat.


REE_1591While the red peppers are sweating, grab some pine nuts. Unless you’re my sister Betsy, and then you need to stay far away from pine nuts or your head will swell to disturbing proportions.


REE_1591Heat a small skillet over medium-low heat. We need to toast our pine nuts.


REE_1592Pour a couple of tablespoons into the pan.


REE_1600Jiggle the pan around from time to time and cook them for about five minutes. Be careful not to burn ‘em.


REE_1601
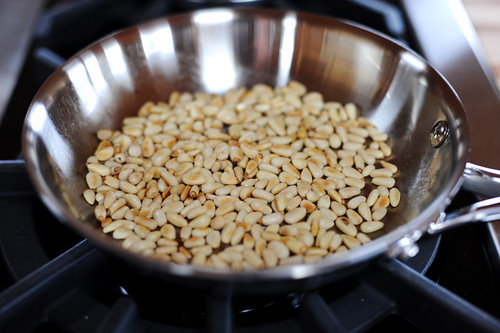
Remove the pan from heat when they’re golden brown. (Note: I toasted more than I’m going to use for the recipe, because I love to have toasted pine nuts on hand.)


REE_1603While the peppers are sweating and the pine nuts are cooling, prepare the other ingredients. Grab three cloves of garlic…


REE_1614Peel and finely mince the cloves.


REE_1615Grab an onion…


REE_1616Cut it in half from root to tip…


REE_1617Peel off the papery skin and cut off the top, then make several vertical slices in the onion.


REE_1618Rotate the onion, then slice downward to create a fine dice.


REE_1604Now it’s time to peel the peppers! Remove them from the Ziploc bag…


REE_1607
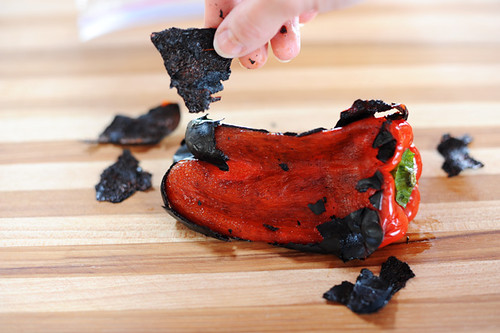
And peel off the outer skin with your fingers. It should slide off really easily. (Some folks like to do this under the faucet, but I don’t like to rinse away all this wonderful flavor.)


REE_1610When it’s all peeled, cut off the tip and slice open the pepper.


REE_1611Run your knife along the inside to scrape out the seeds and membranes.


REE_1612These, by the way, are the charred remains of the peppers. There’s a story here. I don’t know what it is yet, but it’s there. And it’s screaming to be written.


REE_1620Find your blender or food processor.


REE_1621Throw in the peeled and seeded peppers.


REE_1623Pulse several times until it’s pureed.


REE_1624Note that the mixture won’t be totally smooth—it’s have a wonderful red peppery texture.


REE_1631You can leave the peppers plain, or you can sprinkle in a couple of tablespoons of pine nuts. Note that the pine nuts really do impart a pretty strong nutty flavor to the sauce, so if you’re unsure of how you’ll like it, take it easy at first.


REE_1626Bring a pot of water to a boil so you can cook the pasta according to package directions.


REE_1674Confession: I have a SERIOUS weakness for interesting pastas. This is orecchiette, which translates to “Little Ears”.


REE_1675I love orecchiette, because the little “ears” act as cups to collect whatever sauce you use. I find that orecchiette is better with light, creamy sauces than for heavy meat sauces. Just so you know.

I’m a pasta freak. A pasta aficionado. A pasta loon. A pasta goon. Anytime I go to a city, I stock up on interesting pastas.

Does that make me a bad person?


REE_1629In a pot or a skillet over medium heat, drizzle in a couple of tablespoons of olive oil. (Please don’t freak out over the little black spot in the pan. It’s a stray piece of garlic that accidentally fell in there. It’s not a bug or anything.)


REE_1635Throw in the onion and stir around until it begins to soften. Add in the garlic and stir.


REE_1637Pour in the red pepper puree.


REE_1639Just look at the color! The texture! Beautiful.


REE_1644Stir it around, and add in plenty of salt. I say “plenty” because for some reason, I find that the red peppers need more salt to keep the dish from tasting too bland. Salt away! Just tell ‘em Pioneer Woman said it was okay.

*Just cook the mixture over medium to medium-low heat while the pasta cooks. Stir occasionally and make sure it doesn’t burn.


REE_1645When the pasta’s done cooking, drain it and set it aside. Then pour in 1/2 cup of heavy cream into the sauce. (Make sure the heat isn’t too high.)


REE_1647I suppose you COULD use half & half…but why?


REE_1648Stir the sauce to incorporate the cream and evaluate the texture. If you’d like it a little thinner, splash in some half & half.


REE_1652Taste the sauce one last time, and add more salt if necessary. I almost always add more salt at this point.


REE_1654Dump in the pasta starting with 1/2 of the package or so. Stir the mixture together.

I hate it when I add too much pasta for the amount of sauce, so I always start with a little and add more as the sauce permits. If I have leftover pasta, I store it in a Ziploc bag in the fridge and use it to make the kids some macaroni and cheese for lunch the next day.

I am SO not afraid of leftover pasta.


REE_1660
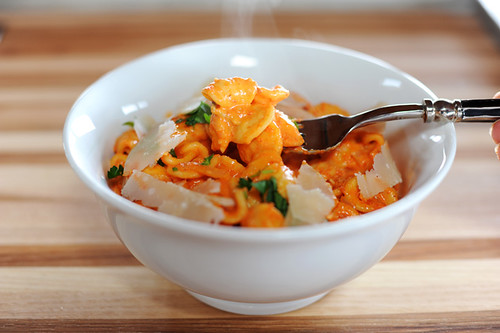
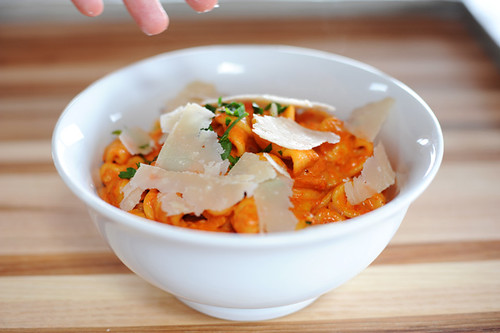
Place a generous portion of pasta in a bowl.


REE_1655Chop up some flat leaf (Italian) parsley, or whatever other herbs you have on hand. But for this dish, I like parsley best.


REE_1662Sprinkle it over the top.


REE_1656Next, grab a block of Parmesan cheese and shave off some thin slices with a vegetable peeler.


REE_1663Generously throw the slices over the top. You can certainly use pregrated Parmesan, but I’m totally in love with Parmesan chunks these days. (See this luscious pasta dish for further evidence of this.)


REE_1666Yum.


REE_1667Yikes.


REE_1669Lawsie.

Bottom Line: Pasta like this renders me speechless.


Pasta with Roasted Red Pepper Sauce

3 red bell peppers
2 tablespoons pine nuts (optional)
1/2 medium onion, finely diced
3 cloves garlic, minced
1/2 cup heavy cream
Flat leaf parsley, finely minced
Fresh Parmesan, shaved or grated
1/2 to 1 pound pasta: orecchiette, penne, fusilli, etc.

Roast red peppers, then place in a Ziploc bag to allow to sweat. Peel the charred skins from the peppers, then removed seeds. Set aside.

Lightly toast pine nuts in a skillet. Set aside.

Puree peppers with pine nuts. Set aside.

Cook pasta according to package directions.

In a skillet or pot over medium heat, drizzle in olive oil. Add diced onions and garlic and cook until soft. Pour in pepper puree and stir together. Add plenty of salt.

Pour in cream and stir to combine. Taste and add more salt, if necessary. Add cooked pasta, then stir together.

Place pasta into a bowl, top with chopped parsley and plenty of shaved Parmesan.

Give thanks for Italy.

Repeat as necessary.